How to Design Packaging for a New Product, A Step-by-Step Guide for Brand Owners
Table of Contents
Why Packaging Design Is a Business Decision, Not Just a Creative One
Most brand owners approach packaging design as a creative exercise, a question of colour, logo placement, and which finish looks best on screen. That instinct is understandable. Packaging is the most visible physical expression of a brand, and the visual decisions matter enormously.
But the brands that get packaging right, the ones whose boxes photograph well, survive international shipping, delight the end customer, and arrive at the fulfilment centre on time and on budget, treat packaging design as a business decision first and a creative decision second.
The creative layer sits on top of a structural foundation. Get the structure right, the box style, the material specification, the protection engineering, the dimensional accuracy, and the creative layer can do its job. Get the structure wrong, and no amount of soft-touch matte lamination or blind debossed logo will save the experience when the box arrives crushed, the lid does not close cleanly, or the product shifts inside during transit.
This guide walks you through every step of the packaging design process, from the first brief to the final production approval, in the sequence that professional packaging buyers and brand managers follow. Whether you are launching your first product or redesigning packaging for an existing line, this is the process that delivers packaging that works commercially, structurally, and creatively.
Step 1 : Define What Your Packaging Needs to Do
Before you open a design file or brief a manufacturer, write down the answers to these five questions. They will determine every decision that follows.
The Five Foundation Questions
1. What is the primary function of this packaging? Is it a retail shelf box, competing for attention at point of sale? A DTC shipping box, protecting the product through a courier network and delivering an unboxing experience at the customer's door? A gift box, presenting a product as a premium gift? A wholesale inner carton, protecting units in transit between factory and retailer? Each function implies a different structural requirement, material specification, and design priority.
2. Who is the end customer? A luxury skincare brand targeting 35–55 year old lady in the UK has different packaging requirements than a DTC supplement brand targeting 25–40 year old gentleman in the United States. The end customer's expectations, for tactile quality, visual language, sustainability credentials, and unboxing experience, should drive every material and finish decision.
3. Where will the packaging be seen first? On a retail shelf, the front panel is the primary communication surface, it needs to work at 30cm distance in mixed lighting. In a DTC context, the packaging is first seen in an unboxing video or social media post, it needs to photograph well and reward close inspection. In a gifting context, the box itself is part of the gift, it needs to feel substantial and premium in the hand before it is opened.
4. What journey will the packaging take? From factory to fulfilment centre to end customer, what are the handling, stacking, temperature, and humidity conditions the packaging will encounter? International air freight has different stress conditions than domestic road freight. A box stored in a climate-controlled retail environment has different material requirements than a box stored in an uncontrolled warehouse.
5. What is the packaging budget per unit? Packaging budget per unit determines the material tier, the finishing options, and the minimum order quantity that makes commercial sense. A realistic budget conversation at the start of the process prevents the disappointment of falling in love with a specification that cannot be produced at the required price point.
Step 2 : Know Your Product Dimensions and Protection Requirements
The single most common cause of packaging design delays is inaccurate or incomplete product dimensions. Before any structural design work can begin, you need to know, with precision, the dimensions and weight of the product that will go inside the box.
What to Measure
| Measurement |
Detail Required |
| Product dimensions |
Length × Width × Height in millimetres — measure the product at its widest point in each axis |
| Product weight |
In grams — affects greyboard specification and closure mechanism selection |
| Clearance required |
Minimum gap between product and inner box wall — typically 5–10mm for rigid boxes |
| Fragility |
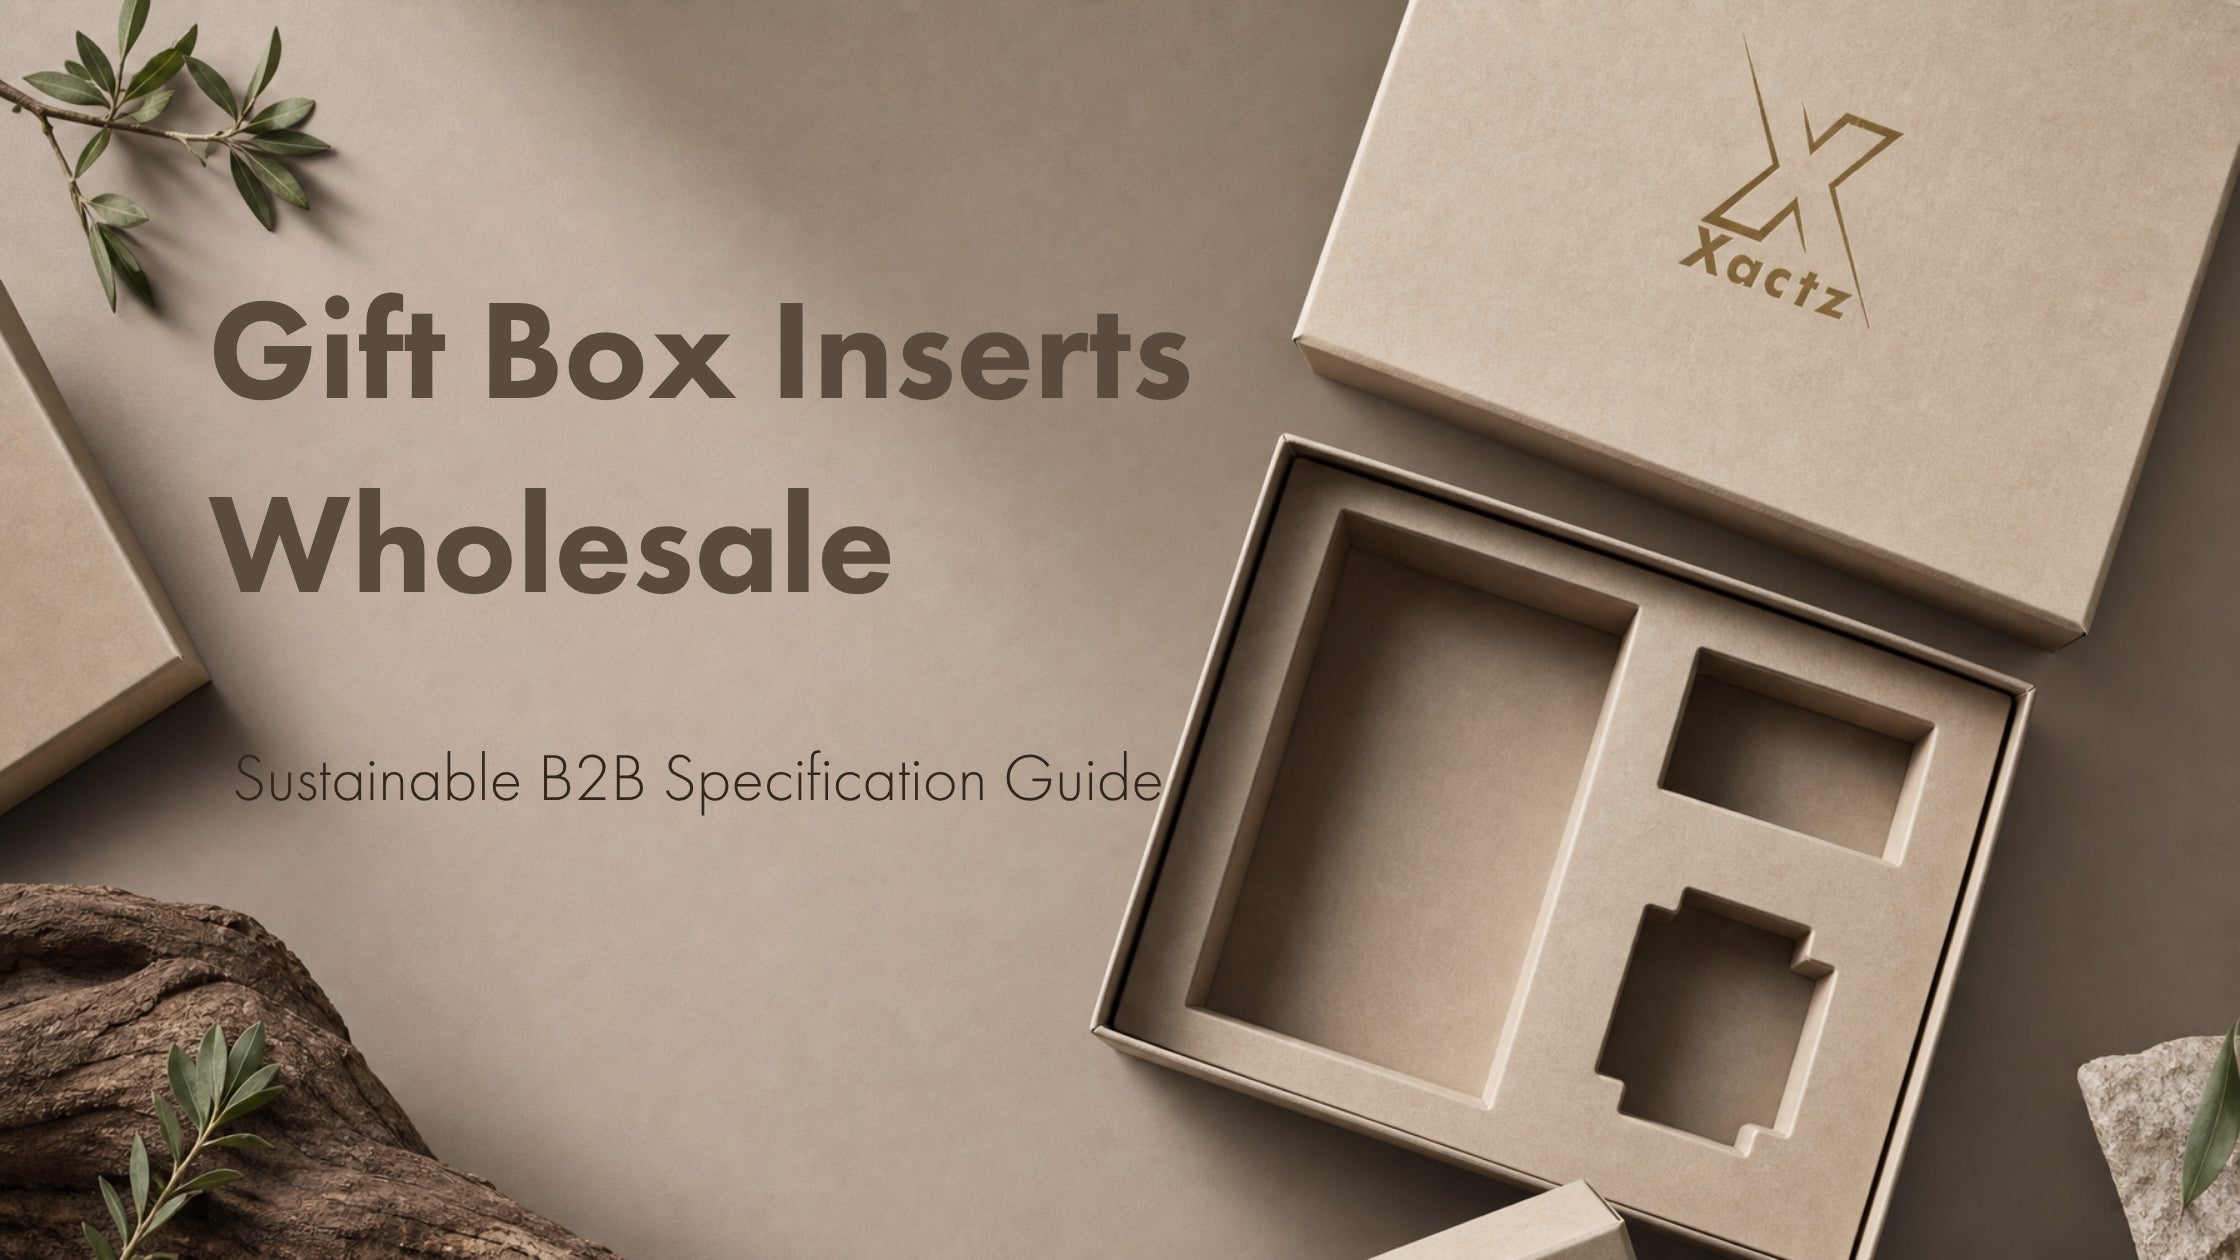
Does the product require cushioning, a moulded insert, or a suspended pack construction? |
| Multiple components |
If the product includes multiple items — product, accessories, documentation — list all components and their dimensions |
| Orientation |
Does the product need to be presented in a specific orientation inside the box? |
| Regulatory markings |
Does the packaging need to carry regulatory text, barcodes, or compliance markings? |
Why Clearance Matters
The internal dimensions of the box are not the same as the product dimensions. A correctly specified box allows enough clearance for the product to be placed and removed cleanly, for any insert or liner to sit correctly, and for the lid to close without pressure on the product. Too tight and the product is difficult to remove and the lid may not close cleanly. Too loose and the product shifts in transit, creating noise, potential damage, and a poor unboxing experience.
For most luxury rigid box applications, a clearance of 5–8mm on each side and 3–5mm above the product is the standard starting point. Your manufacturer will refine this based on the specific box style and insert construction.
Step 3 : Choose Your Box Style
Box style is the structural format of the packaging, the architecture that determines how the box opens, how the product is revealed, and how the packaging is experienced by the end customer.
The Main Box Styles for New Product Packaging
| Box Style |
Best For |
Unboxing Experience |
Shipping Efficiency |
| Rigid Lid and Base |
Gifting, premium retail, jewellery, cosmetics |
Classic reveal, lift the lid |
❌ Ships assembled, full volume |
| Magnetic Closure Rigid Box |
Premium DTC, luxury gifting, electronics accessories |
Soft resistance, satisfying close |
❌ Ships assembled, full volume |
| Drawer Box (Sliding) |
Jewellery, accessories, premium confectionery |
Theatrical slide reveal |
❌ Ships assembled, full volume |
| Book-Style Box |
Premium gifting, corporate gifting, multi-component sets |
Hinged open, book reveal |
❌ Ships assembled, full volume |
| Foldable Rigid Box (Flat-Pack) |
DTC, international shipping, high-volume brands |
Magnetic close, identical to rigid |
✅ Ships flat, 80% volume reduction |
| Folding Carton |
Retail shelf, FMCG, mid-market |
Standard open-top or tuck-end |
✅ Ships flat |
| Kraft Box |
DTC, sustainable brands, artisanal products |
Natural, tactile reveal |
✅ Ships flat |
| Corrugated Shipping Box |
Outer transit packaging, e-commerce |
Functional, not a primary brand surface |
✅ Ships flat |
How to Choose
-
If your product is a premium gift or retail item and shipping volume is not a constraint Rigid Lid and Base or Magnetic Closure Rigid Box
-
If you are shipping DTC internationally and shipping cost is a significant factor Foldable Rigid Box (Flat-Pack)
-
If you need a theatrical, high-impact reveal for a luxury product Drawer Box or Book-Style Box
-
If you are launching a sustainable or artisanal brand Kraft Box with premium finishing
-
If you need retail shelf presence at an accessible price point Folding Carton with premium finishing
Step 4 : Select Your Materials
Material selection determines the structural performance, tactile quality, sustainability credentials, and unit cost of your packaging. The key material decisions for a new product packaging brief are greyboard weight, wrap paper, and interior lining.
Greyboard Core
| Weight |
Application |
Performance |
| 800–1,000 gsm |
Entry-level rigid box, light products |
Adequate rigidity for small, light products |
| 1,200–1,500 gsm |
Standard luxury rigid box |
Recommended for most luxury applications |
| 1,500–1,800 gsm |
Premium luxury rigid box, heavy products |
Maximum rigidity, premium hand-feel |
| FSC-certified greyboard |
All weights available |
No performance compromise, recommended as standard |
Wrap Paper
| Paper Type |
Hand-Feel |
Best For |
| Uncoated kraft paper |
Natural, tactile, slightly textured |
Sustainable brands, artisanal, DTC |
| Textured art paper (linen, canvas, laid) |
Distinctive tactile surface |
Premium gifting, jewellery, cosmetics |
| Smooth coated art paper |
Clean, modern, print-accurate |
Full-colour brand expression, retail |
| Recycled content art paper |
Natural, slightly textured |
Sustainability-led premium brands |
| Specialty papers (metallic, pearlescent) |
High-impact visual surface |
Luxury fragrance, premium spirits, gifting |
Interior Lining
| Lining Type |
Luxury Credential |
Best For |
| Uncoated paper lining |
Clean, premium, recyclable |
Most luxury applications |
| Flocked paper lining |
Velvet-like tactile surface |
Jewellery, watches, premium accessories |
| Satin fabric lining |
Soft, premium, tactile |
High-end gifting, luxury cosmetics |
| Paper pulp tray insert |
Precision-moulded, sustainable |
Product protection and presentation |
| EVA foam insert |
High protection, custom-moulded |
Electronics, fragile products |
| Ribbon pull tab |
Premium reveal mechanism |
Gifting, jewellery, cosmetics |
Step 5 : Define Your Brand Identity on the Box
The packaging is the most tangible physical expression of your brand. Before briefing a designer or manufacturer, define the brand identity elements that need to appear on the packaging and the hierarchy in which they communicate.
Brand Identity Elements to Define
Logo Primary brand mark. Specify the version (horizontal, stacked, icon only), the colour (Pantone reference), and the intended finish (print, foil stamp, emboss, deboss).
Colour palette Specify all colours in Pantone (PMS) references. Do not rely on RGB or CMYK values alone, colour rendering varies significantly across paper stocks and lamination types. Pantone references allow your manufacturer to match colour accurately across production runs.
Typography Specify the typefaces used on the packaging, including any secondary text (product name, tagline, weight, volume, regulatory text). Provide fonts in the design file, do not rely on system fonts.
Brand language What does the packaging say, beyond the logo? A tagline, a brand statement, a product descriptor, a sustainability claim? Define the hierarchy of text elements and their intended placement.
Brand story Many premium brands include a short brand story or founder message on the interior of the lid or the base of the box. This is a high-value brand touchpoint that costs almost nothing to add and significantly increases the perceived premium of the unboxing experience.
The Three Surfaces
Every box has three primary communication surfaces, the exterior, the interior, and the base. Most brands focus exclusively on the exterior. The brands that create genuinely memorable unboxing experiences treat all three surfaces as brand real estate.
| Surface |
Brand Opportunity |
| Exterior |
Logo, brand colour, primary brand statement, the first impression |
| Interior lid |
Brand story, founder message, product care instructions, the reveal moment |
| Base |
Certifications, sustainability credentials, contact details, website, the final touchpoint |
Step 6 : Choose Your Finishing Options
Finishing is the layer of tactile and visual detail that elevates packaging from functional to genuinely premium. The right combination of finishing options communicates quality before the box is opened, through the hand, the eye, and the light.
Finishing Options and Their Effect
| Finish |
Effect |
Luxury Credential |
Cost Impact |
| Soft-touch matte lamination |
Velvet-like surface, absorbs light, invites touch |
Highest tactile luxury signal |
Low |
| Matte lamination (water-based) |
Clean, flat surface, no glare |
Modern premium |
Low |
| Gloss lamination |
High-shine surface, reflects light |
High-impact visual, mass-market association |
Low |
| Embossing |
Raised tactile impression, logo or pattern |
Premium tactile brand mark |
Medium |
| Debossing |
Recessed tactile impression |
Understated luxury, rewards inspection |
Medium |
| Hot foil stamping (gold/silver/custom) |
Metallic reflective surface, catches light |
Luxury signal, gifting, fragrance, jewellery |
Medium |
| Spot UV varnish |
Selective gloss contrast on matte surface |
Sophisticated, logo or pattern highlight |
Medium |
| CMYK print with soy-based inks |
Full-colour brand expression |
Versatile, retail, DTC, gifting |
Low |
| Blind deboss |
Tone-on-tone recessed impression |
Subtle, sophisticated, rewards close inspection |
Medium |
The Most Effective Combinations
-
Soft-touch matte + blind deboss the most widely used luxury packaging finish combination. Velvet surface with a subtle tactile logo. Works across all product categories.
-
Matte lamination + gold foil stamp clean modern surface with a premium metallic brand mark. Strong for gifting, fragrance, and jewellery.
-
Kraft paper + deboss natural surface with a tactile brand mark. The defining finish combination for sustainable premium brands.
-
Soft-touch matte + spot UV velvet surface with selective gloss contrast. High sophistication, logo or pattern appears to float on the surface.
Step 7 : Design the Interior Experience
The interior of the box is the moment of truth. It is the first thing the customer sees when the lid is lifted, and it is the moment that either confirms or undermines the premium promise communicated by the exterior.
Interior Design Principles
Colour continuity The interior lining colour should be intentional, either a continuation of the exterior brand colour, a complementary contrast, or a neutral that allows the product to be the hero. White, black, and natural kraft are the most versatile interior lining colours. Brand colours used on the interior create a strong, immersive brand environment.
Product presentation The product should be presented at the correct height and orientation inside the box. A correctly specified insert or tray holds the product securely, presents it at the optimal viewing angle, and prevents movement in transit. A product that sits too low in the box, tilts, or shifts on opening undermines the unboxing experience regardless of the quality of the exterior finish.
The reveal sequence Consider the order in which elements are revealed as the box is opened. In a multi-component set, the primary product should be the first thing seen. Supporting items, accessories, documentation, samples, should be positioned to be discovered after the primary product, not competing with it for attention on opening.
Brand touchpoints inside the box A printed message on the interior lid, a branded tissue paper wrap, a personalised insert card, a ribbon pull tab, each of these elements adds a layer of brand experience that the customer will notice, remember, and share.
Step 8 : Brief Your Manufacturer
A complete, precise brief is the single most important factor in getting your packaging right first time. An incomplete brief leads to assumptions, revisions, sample rejections, and delays. A complete brief leads to an accurate first sample, a faster approval process, and a production run that matches what was agreed.
The Complete Packaging Brief
| Element |
Detail to Provide |
| Product dimensions |
L × W × H in mm, at widest point |
| Product weight |
In grams |
| Box style |
Lid and base / magnetic closure / drawer / book-style / flat-pack |
| Internal dimensions |
Or specify product dimensions + clearance required |
| Greyboard weight |
gsm specification or ask manufacturer to recommend |
| Wrap paper |
Type, weight, colour, texture, Pantone reference |
| Lamination |
Matte / soft-touch matte / gloss, confirm water-based |
| Finishing |
Emboss / deboss / foil stamp / spot UV, placement and Pantone/foil reference |
| Interior lining |
Paper type, colour, texture |
| Insert / tray |
Type, material, product dimensions for moulding |
| Magnetic closure |
Yes / No, magnet strength if applicable |
| Exterior print |
CMYK / Pantone, provide AI or PDF with bleed, fonts embedded |
| Interior print |
Brand story, message, certifications, copy and design file |
| Quantity |
Order volume and annual forecast |
| Delivery requirement |
Required delivery date and destination |
| Sustainability requirement |
FSC-certified board / water-based lamination / PCR content |
| Sample requirement |
Confirm pre-production sample required before full production |
| Budget |
Per-unit target or total budget |
Step 9 : Review Your Pre-Production Sample
The pre-production sample is the most important quality checkpoint in the packaging development process. It is the physical proof of every decision made in the brief, and the last opportunity to identify and correct issues before full production.
What to Check on Your Pre-Production Sample
Structural performance
- Does the lid close cleanly and sit flush with the base?
- Is the magnetic closure aligned and functioning correctly?
- Are the corners sharp and well-defined?
- Does the box feel rigid and substantial in the hand?
- Does the product fit correctly with the specified clearance?
Surface finish
- Does the lamination feel correct, soft-touch, matte, or gloss as specified?
- Is the emboss or deboss depth correct and cleanly defined?
- Is the foil stamp coverage complete with no voids or lifting?
- Is the spot UV coverage accurate to the design file?
Colour accuracy
- Does the exterior colour match the specified Pantone reference under natural light?
- Does the print colour match the approved design file?
- Is the interior lining colour correct?
Construction quality
- Is the wrap paper applied cleanly with no bubbles, wrinkles, or lifting at the corners?
- Are the interior lining joins clean and invisible?
- Is the insert or tray correctly moulded to the product dimensions?
Brand elements
- Is the logo positioned correctly on all surfaces?
- Is all text legible and correctly typeset?
- Are all Pantone and foil references correct?
The Sample Approval Process
At Xactz, pre-production samples are produced within 1–3 business days of brief confirmation. Sample review comments are incorporated and a revised sample produced if required before full production approval is given. No full production run begins without explicit sample approval from the client.
Once the pre-production sample is approved, full production begins. At Xactz, production turnaround from sample approval is 10–18 days depending on order volume, finishing complexity, and current production scheduling.
Step 10 : Approve and Scale
What Happens in Production
| Stage |
Process |
| Material preparation |
Greyboard cut to specification, wrap paper prepared and printed |
| Lamination and finishing |
Lamination applied, emboss / deboss / foil stamp / spot UV processed |
| Box construction |
Greyboard scored, wrapped, and assembled, or scored and flat-packed |
| Insert production |
Paper pulp tray moulded, foam insert cut, or board insert constructed |
| QC inspection |
18-point quality check, dimensions, finish, colour, construction, closure |
| Packing and export |
Boxes packed, export documentation prepared, freight booked |
Scaling Your Packaging
The first production run is rarely the last. As your brand grows, your packaging requirements will evolve, new product lines, seasonal limited editions, updated brand identity, higher volumes, new markets. The relationship with your manufacturer becomes more valuable over time. A manufacturer who understands your brand, holds your approved specifications on file, and can respond quickly to new briefs is a commercial asset.
At Xactz, all approved specifications are held on file and available for repeat orders, line extensions, and seasonal variants, with no re-briefing required for unchanged elements.
Common Packaging Design Mistakes : And How to Avoid Them
| Mistake |
Why It Happens |
How to Avoid It |
| Designing for screen, not for print |
Brand colours specified in RGB, not Pantone |
Always specify colours in Pantone (PMS) references |
| Incorrect product dimensions |
Dimensions taken from CAD file, not physical product |
Measure the physical product, including any coating, label, or cap |
| Insufficient clearance |
Internal dimensions set equal to product dimensions |
Add minimum 5–8mm clearance on each side |
| Finishing placed at fold points |
Foil stamp or emboss specified across a score line |
Confirm all finishing placement with manufacturer before production |
| No pre-production sample |
Pressure to meet launch deadline |
Always require a physical sample, it costs less than a rejected production run |
| Ignoring the interior |
Focus on exterior appearance only |
Brief the interior lining, insert, and any interior print at the same time as the exterior |
| Under-specifying greyboard |
Choosing the lowest cost option |
Match greyboard weight to product weight and box dimensions, ask your manufacturer to recommend |
| No sustainability specification |
Sustainability not considered at brief stage |
Specify FSC-certified board and water-based lamination as a default, no cost premium |
| Briefing without a budget |
Assuming cost will be addressed after design |
Provide a per-unit budget target at brief stage, it shapes every material and finish decision |
| Single-sourcing without a backup |
Relying on one manufacturer with no contingency |
Establish a relationship with a manufacturer who can scale with you and holds your specifications on file |
Packaging Design Checklist for Brand Owners
Use this checklist before briefing your manufacturer to confirm your brief is complete.
Foundation
Product
Structure
Materials
Finishing
Brand
Production
Frequently Asked Questions
How long does it take to design and produce packaging for a new product? The full timeline from initial brief to delivered production run is typically 3–5 weeks. Pre-production sample turnaround at Xactz is 1–3 business days. Full production from sample approval is 10–18 days. Allow additional time for international freight, 5–35 days depending on shipping method.
What is the minimum order quantity for new product packaging? At Xactz, MOQ starts from 100 units across all box styles and formats. This makes custom luxury packaging accessible for new product launches, limited editions, and brand tests.
Do I need a designer before briefing a packaging manufacturer? Not necessarily for the structural brief. You can brief the box style, dimensions, materials, and finishing without a completed design file. However, you will need a completed design file, AI or PDF with bleed, fonts embedded, and Pantone references, before production can begin. Many brands develop the structural brief and design in parallel.
How do I know what box style is right for my product? Start with the end customer experience, how do you want the product to be revealed? Then consider the commercial constraints, shipping volume, storage, and budget. The Xactz team provides free structural consultations for new product packaging briefs.
What file format do I need to provide for packaging print? Adobe Illustrator (AI) or PDF with bleed included, fonts embedded, and all colours specified in Pantone (PMS) references. CMYK values are accepted but Pantone references are strongly recommended for colour accuracy across production runs.
Can I get a sample before committing to a full production run? Yes, and you should always require one. At Xactz, pre-production samples are produced for every new brief before full production approval is given. The sample cost is credited against the full production order.
What sustainability options are available for new product packaging? FSC-certified greyboard and wrap paper, water-based lamination, soy-based inks, PCR (post-consumer recycled) content materials, and paper pulp tray inserts are all available as standard options at Xactz, with no significant cost premium over non-certified equivalents.
How do I calculate the right internal dimensions for my box? Measure your product at its widest point in each axis (L × W × H), then add your required clearance, typically 5–8mm on each side and 3–5mm above the product. Your manufacturer will refine these dimensions based on the specific box style, insert construction, and greyboard thickness.
Can I use my existing brand colours on custom packaging? Yes, provide your Pantone (PMS) references and your manufacturer will match them. If you only have RGB or CMYK values, your manufacturer can identify the closest Pantone match, but a pre-production sample is strongly recommended to confirm colour accuracy before full production.
What happens if I am not happy with the pre-production sample? The sample review process exists precisely to identify and correct issues before full production. At Xactz, sample review comments are incorporated and a revised sample produced at no additional charge until the brief is met. Full production does not begin until you are satisfied with the sample.
Why Brand Owners Choose Xactz for New Product Packaging
Xactz is one of China's leading luxury custom packaging manufacturers, trusted by premium brands, DTC labels, and global retailers across 60+ countries since 2006. For new product packaging, we offer:
-
Free structural consultation our engineering team reviews your product dimensions, brief requirements, and budget and recommends the optimal box style, material specification, and finishing combination
-
1–3 day sample turnaround physical pre-production samples produced and dispatched within 1–3 business days of brief confirmation
-
10–18 day production turnaround from sample approval to completed production run
-
MOQ from 100 units custom luxury packaging accessible for new product launches at any scale
-
Full finishing range in-house soft-touch matte, emboss, deboss, foil stamp, spot UV, CMYK print, all produced across 40,000+ sqm of automated facilities in Shenzhen and Huizhou, China
-
FSC™ Certified (SGSHK-COC-332603) verified sustainable sourcing across all material specifications
-
ISO 9001:2015 consistent quality management across every production run
-
TÜV Rheinland Verified Supplier independently audited manufacturing and supply chain
-
18-point QC inspection every production run checked for dimensions, finish, colour, construction, and closure before dispatch
-
Global delivery to 60+ countries full export documentation and compliance support
-
Specifications held on file repeat orders, line extensions, and seasonal variants produced without re-briefing
Whether you are launching your first product or scaling an established brand, the Xactz team will guide you through every step of the packaging design process, from the first brief to the final delivery.
Final Thoughts
Designing packaging for a new product is one of the most consequential decisions a brand owner makes. The packaging is the first physical touchpoint between your brand and your customer, and it communicates quality, values, and attention to detail before the product inside is ever seen.
The brands that get packaging right are not the ones with the biggest budgets. They are the ones that follow the process, defining the brief precisely, selecting materials and finishes that serve the brand and the product, requiring a pre-production sample before committing to full production, and working with a manufacturer who understands that packaging is not a commodity.
Follow the ten steps in this guide. Use the checklist. Brief your manufacturer completely. Require a sample. And choose a manufacturer who treats your packaging with the same seriousness you do.
The result will be packaging that works commercially, structurally, and creatively, and that delivers the brand experience your customers deserve.
Ready to design packaging for your new product? Contact the Xactz team for a free structural consultation, sample quote, and cost estimate no obligation, no minimum commitment to enquire.
👉 Get in Touch with Xactz